Development: Running Swift/Vapor in Codeanywhere
Swift was introduced as a proprietary language by Apple in 2014, and it was open-sourced in 2015. Initially, Swift is used mainly for iOS development, but now developers are starting to use it for web development via the server-side Swift frameworks. One of the frameworks is called Vapor, which is the only one currently written purely in Swift.
Codeanywhere is a cloud-based development environment, basically consisting of virtual machines (similar to DigitalOcean) and a full-fledged code editor. Recently, Codeanywhere has started to provide a Swift container (like the Docker concept), for assisting developers to jumpstart Swift development. Unfortunately, the Swift release provided in the container is only version 2.2, while the Vapor framework requires version 3 or above.
This article is going to show you how to upgrade the Swift release in the pre-defined container, download the Vapor framework/example, and launch the Vapor example in the Codeanywhere environment.

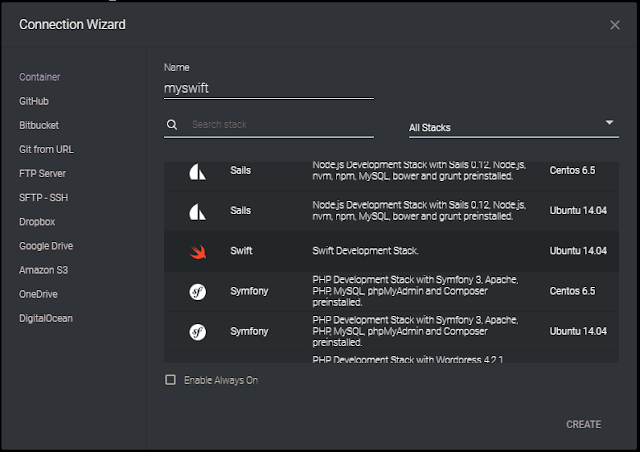
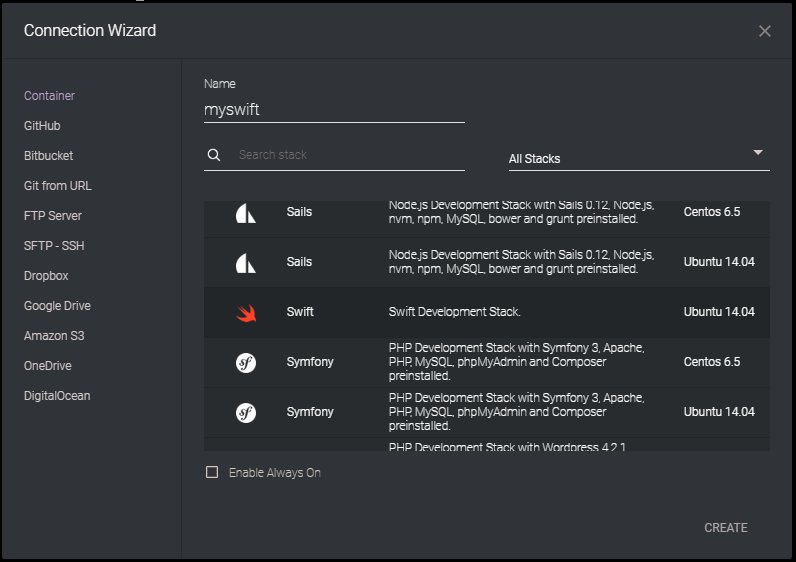
2. Go to File->New Connection->Container (refer to Codeanywhere documentation)
3. Choose the Swift container and name the new container (e.g.: myswift)
2. Ensure the version to be "2.2-dev"


2. Since the Codeanywhere Swift container is currently using Ubuntu 14.04, simply copy the corresponding link from the Download column
3. You should be getting the link similar as:
$ https://swift.org/builds/swift-3.1-branch/ubuntu1404/swift-3.1-DEVELOPMENT-SNAPSHOT-2017-06-14-a/swift-3.1-DEVELOPMENT-SNAPSHOT-2017-06-14-a-ubuntu14.04.tar.gz
4. Then download the release file using the link to the Swift container from the SSH terminal:
$ wget <swift-release-tar-file-link>

$ tar -zxf <swift-release-tar-file>

2. Replace existing swift directory (for v2.2) with the new swift release folder (for v3.1.1)
$ rm -rf /home/cabox/swift
$ mv <new-swift-release-folder> /home/cabox/swift
Ensure the Swift current version is changed to version 3.1.1
$ swift --version

3. Remove the new swift release file for freeing up disk space (since Codeanywhere only offers 2GB hard disk space in the Free Plan)
$ rm <new-swift-release-tar-file>

$ git clone https://github.com/tannernelson/vapor-example.git

2. Build the Vapor example application
$ cd vapor-example
$ swift build
NOTE: The build will fail if the Swift release is not a development release
 3. Launch the Vapor example application
$ chmod 775 .build/debug/App
$ .build/debug/App

2. Right click on the current container (i.e.: myswift) under Connections
3. Select Info to show all the infrastructure information (refer to Codeanywhere documentation)

4. In this case, the required URL is
http://port-XX.myswift-cslredcomet314793.codeanyapp.com/
where XX will be replaced with 8080 (i.e.: the port number the Vapor application is listening to)

5. Go to the browser using the obtained URL
http://port-8080.myswift-cslredcomet314793.codeanyapp.com/
And you should see the Vapor welcome page

Not sure if these two issues are specific to Codeanywhere containers, feel free to let me know if anyone has more information. For now, you can simply change the source codes in the Vapor example (i.e.: vapor-example/Sources/App), and rebuild/rerun the application (by repeating Step 5.2 and 5.3).
Finally, enjoy using Swift with Vapor in Codeanywhere for your web development!!!
Codeanywhere is a cloud-based development environment, basically consisting of virtual machines (similar to DigitalOcean) and a full-fledged code editor. Recently, Codeanywhere has started to provide a Swift container (like the Docker concept), for assisting developers to jumpstart Swift development. Unfortunately, the Swift release provided in the container is only version 2.2, while the Vapor framework requires version 3 or above.
This article is going to show you how to upgrade the Swift release in the pre-defined container, download the Vapor framework/example, and launch the Vapor example in the Codeanywhere environment.

Step 1 - Create new Swift container
1. Login to your Codeanywhere IDE2. Go to File->New Connection->Container (refer to Codeanywhere documentation)
3. Choose the Swift container and name the new container (e.g.: myswift)
Step 2 - Check current Swift version in container
1. Open SSH terminal (refer to Codeanywhere documentation)2. Ensure the version to be "2.2-dev"

Step 3 - Download new Swift release
1. Find the URL of Swift 3.1.1 development release from the Swift.org snapshots page as below:
2. Since the Codeanywhere Swift container is currently using Ubuntu 14.04, simply copy the corresponding link from the Download column
3. You should be getting the link similar as:
$ https://swift.org/builds/swift-3.1-branch/ubuntu1404/swift-3.1-DEVELOPMENT-SNAPSHOT-2017-06-14-a/swift-3.1-DEVELOPMENT-SNAPSHOT-2017-06-14-a-ubuntu14.04.tar.gz
4. Then download the release file using the link to the Swift container from the SSH terminal:
$ wget <swift-release-tar-file-link>

Step 4 - Replace existing Swift release in container
1. Extract the release file to a new folder$ tar -zxf <swift-release-tar-file>

2. Replace existing swift directory (for v2.2) with the new swift release folder (for v3.1.1)
$ rm -rf /home/cabox/swift
$ mv <new-swift-release-folder> /home/cabox/swift
Ensure the Swift current version is changed to version 3.1.1
$ swift --version

3. Remove the new swift release file for freeing up disk space (since Codeanywhere only offers 2GB hard disk space in the Free Plan)
$ rm <new-swift-release-tar-file>

Step 5 - Launch Vapor example
1. Download Vapor framework and example codes from Git$ git clone https://github.com/tannernelson/vapor-example.git

2. Build the Vapor example application
$ cd vapor-example
$ swift build
NOTE: The build will fail if the Swift release is not a development release
$ chmod 775 .build/debug/App
$ .build/debug/App
Step 6 - Access Vapor example welcome page
1. Find the URL for accessing the Codeanywhere Swift container2. Right click on the current container (i.e.: myswift) under Connections
3. Select Info to show all the infrastructure information (refer to Codeanywhere documentation)

4. In this case, the required URL is
http://port-XX.myswift-cslredcomet314793.codeanyapp.com/
where XX will be replaced with 8080 (i.e.: the port number the Vapor application is listening to)

5. Go to the browser using the obtained URL
http://port-8080.myswift-cslredcomet314793.codeanyapp.com/
And you should see the Vapor welcome page

Final Notes
For upgrading the Swift release, the reason using a development release instead of production is, the production release will cause a linking error when building with Vapor. Also, installing Vapor via the Vapor Toolbox (which provides shortcut commands like "vapor run") causes some errors as well. Therefore, the Vapor installation is performed from Git instead, along with the example codes.Not sure if these two issues are specific to Codeanywhere containers, feel free to let me know if anyone has more information. For now, you can simply change the source codes in the Vapor example (i.e.: vapor-example/Sources/App), and rebuild/rerun the application (by repeating Step 5.2 and 5.3).
Finally, enjoy using Swift with Vapor in Codeanywhere for your web development!!!
Thanks for sharing!!!
ReplyDeleteOne of the key features said to be coming to
ReplyDeletethe HomePod is the ability to make or receive phone calls
Read More At iOS Online Course
Hello, I would like to appreciate your work. It’s a great platform got to learn a lot. Your data is really worthy. Thank you so much. Keep it up!
ReplyDeletePlay Box APP
Playbox HD Android Download